
If you’ve ever tried working with a Molex Mini-Fit Jr assembly for the first time, you already know – it’s not difficult, but it’s also not something you want to get wrong.
A loose crimp, incorrect wiring, or even a slightly misaligned pin can lead to overheating, poor contact, or complete failure. And in real-world setups – especially in Indian manufacturing environments like Mumbai where heat, load, and long operating hours are common- those small mistakes show up quickly.
So instead of overcomplicating it, let’s walk through the process the way it actually happens on the shop floor.
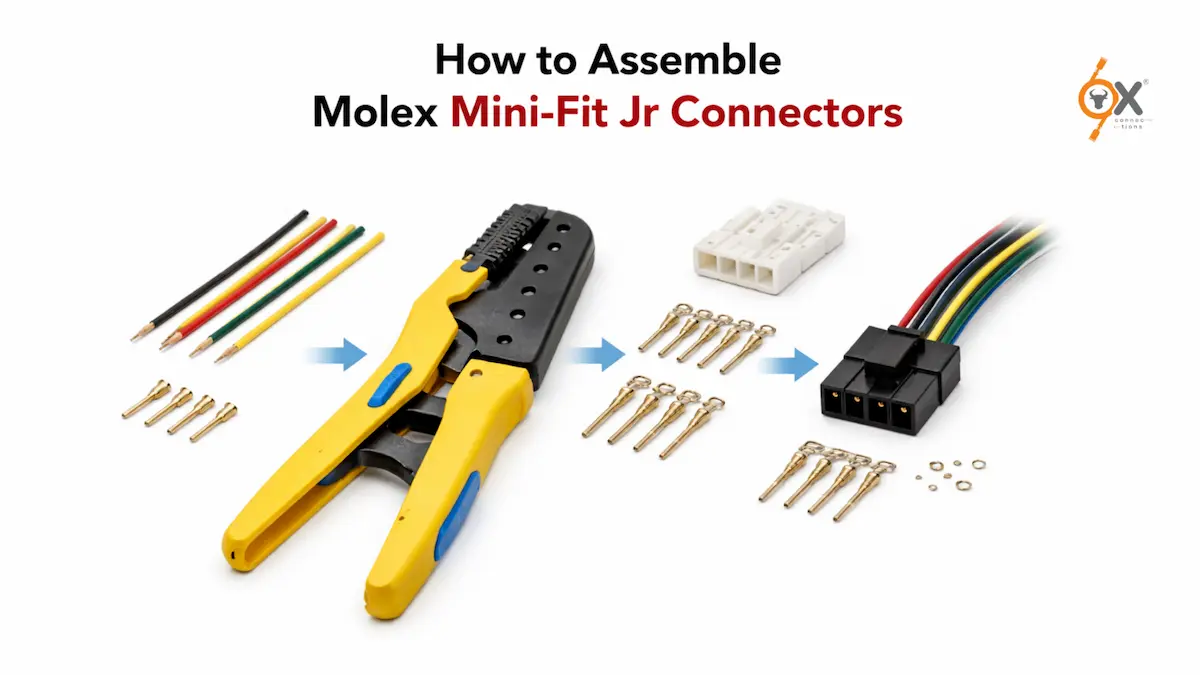
Understanding What You’re Working With
Before you start, it helps to know what makes up a typical Molex Mini-Fit Jr connector. You’re essentially dealing with three parts: the housing, the crimp terminals, and the wires. That’s it.
The housing holds everything in place, the terminals carry the current, and your wiring determines whether the whole system works – or fails.
This is why Molex connector wiring isn’t just about connecting point A to point B. It’s about making sure the connection stays stable under load.
Why Crimping Is the Step That Matters Most
Let’s be honest – most assembly issues don’t come from the connector itself. They come from poor Molex Mini-Fit Jr crimping.
Crimping is where the wire and terminal become one solid connection. If this step is done right, everything else falls into place. If it’s done poorly, no amount of adjustment later will fix it.
A good crimp should feel tight, secure, and uniform. The wire shouldn’t pull out easily, and the terminal shouldn’t look flattened or damaged.
In many small workshops across India, people still use generic tools or manual pressure for crimping. It works temporarily – but over time, it leads to inconsistent connections. That’s one of the most common reasons for field failures.
The Actual Assembly Process (Without Overcomplicating It)
Once your wire is stripped to the right length, the first real step is crimping the terminal onto the wire. This needs a steady hand and the right pressure – not too loose, not too aggressive.
After crimping, the terminal is inserted into the connector housing. You’ll usually hear or feel a small “click” – that’s your confirmation that it’s locked in place.
This is where many people rush. But it’s important to double-check alignment, because forcing a terminal in the wrong way can damage both the pin and the housing.
Once all terminals are inserted, the final step is simply verifying the connection. A gentle pull test and visual check go a long way in avoiding future issues.
Getting the Pinout Right (More Important Than It Seems)
Even if your crimping is perfect, incorrect pin placement can still cause problems. That’s where understanding the pin configuration becomes critical.
Most Mini-Fit Jr connectors follow a structured layout, but applications vary. In power systems, certain pins are designated for voltage and others for ground.
If you mix these up, the connector won’t just fail – it can damage the entire system.
This is why professionals always cross-check the pinout before final assembly. It takes a few extra minutes, but saves hours of troubleshooting later.
Common Mistakes That Show Up in Real Projects
If you look at connector failures in actual Indian industrial setups, the issues are surprisingly consistent.
Sometimes the wire isn’t stripped properly, which affects the crimp. In other cases, the wrong terminal size is used, leading to loose connections. And quite often, connectors are pushed beyond their current capacity – especially in high-load environments like factories in Mumbai.
Another common issue is mixing different quality components – using a good housing with a low-grade terminal, or vice versa. It might seem harmless initially, but over time it reduces reliability.
Why Assembly Quality Matters More in India
In controlled environments, connectors perform close to their rated specifications. But in India, especially in cities like Mumbai where humidity, dust, and heat are part of daily operations, conditions are very different.
That means your Molex Mini-Fit Jr assembly needs to be even more precise.
A slightly weak crimp or minor misalignment that might go unnoticed elsewhere can lead to:
- Heat buildup
- Voltage drops
- Connector degradation over time
This is why many experienced engineers here focus more on assembly quality than just specifications.
Where Sourcing Also Plays a Role
Interestingly, assembly quality isn’t just about skill – it’s also about the components you use.
Many manufacturers in India face challenges like:
- High cost of branded connectors
- Long lead times
- Limited availability
And when timelines are tight, teams sometimes compromise by using whatever is available.
This is where Mumbai-based OXConnections has become a practical alternative. They offer Mini-Fit Jr compatible connectors that are:
- Cost-effective
- Easily available without long waits
- Backed by certifications like UL, RoHS, and CE
For many OEMs, this combination of availability + reliability makes a real difference during production.
A Practical Way to Get It Right Every Time
Instead of treating connector assembly like a one-time task, it helps to think of it as a repeatable process.
When you focus on:
- Consistent Mini-Fit Jr crimping
- Accurate Molex connector wiring
- Careful pin placement
you naturally reduce errors and improve long-term performance.
It’s not about perfection – it’s about consistency.
Final Thoughts
Assembling a Mini-Fit Jr connector isn’t complicated – but doing it well requires attention to detail.
The difference between a connector that lasts years and one that fails early usually comes down to:
- How well it was crimped
- Whether the wiring was accurate
- And how carefully it was assembled
In fast-paced manufacturing environments across India, getting these basics right can save time, cost, and unnecessary rework.
Because at the end of the day, a connector is a small component – but it carries a big responsibility.